Spring Interview Preparation
Interview Preparation
Spring Boot
1.
management.endpoints.web.exposure.include=httptrace
When we work with microservices or web services in general, it's
quite useful to know how our users interact with our services. This can be
achieved by tracing all the requests that hit our services and collect this
information to analyze it later.
There some systems available out there that can help us with this
and can be easily integrated with Spring like Zipkin.
However, Spring Boot Actuator has this
functionality built-in and can be used through its httpTrace endpoint
which traces all HTTP requests. In this tutorial, we'll show how to use it and
how to customize it to fit better our requirements.
@Repository
public class CustomTraceRepository implements HttpTraceRepository {
“From above for tracing we
can use zipkin server and spring boot actuator”
2. Spring Boot Actuator - It’s
an immensely helpful library that helps you monitor app health and interactions
with the app - perfect for going to production! Spring Boot Actuator includes a
built-in endpoint for tracing HTTP calls to your application
3.
What
does @configuration do in Spring?
@Configuration
annotation indicates that a class declares one or more @Bean methods and
may be processed by the Spring container to generate bean definitions and
service requests for those beans at runtime.
Using Spring, we usually have many ways to
achieve the same goal, including fine-tuning HTTP responses.
we'll see how to set the body, status, and headers of an HTTP response using ResponseEntity.
4. ResponseEntity - represents the whole HTTP response: status
code, headers, and body. As a result, we can use
it to fully configure the HTTP response. If we want to use it, we have
to return it from the endpoint; spring takes care of the rest.
public class
ResponseEntity<T> extends HttpEntity<T>
While returning ResponseEntity<T> object
from the controller, we might get an exception or error while processing the
request and would like to return
error-related information to the user represented as some other type, let's say
E.
5. @RequestBody
-Simply
put, the @RequestBody annotation maps the HttpRequest body
to a transfer or domain object, enabling
automatic deserialization of the inbound HttpRequest body onto a
Java object.
First,
let's have a look at a Spring controller method:
@PostMapping("/request")
public
ResponseEntity postController(
@RequestBody
LoginForm loginForm) {
Spring automatically deserializes the
JSON into a Java type, assuming an appropriate one is specified.
By
default, the type we
annotate with the @RequestBody annotation must correspond to the JSON
sent from our client-side controller
@RestController -> it automatically
converts the response bodies of all api’s into json format.
6. HTTP status codes are divided into
5 classes based on the first digit of the status code:
·
1xx – informational – the
request was received, continuing process
·
2xx – successful – the
request was received successfully and accepted
·
3xx – redirection – further
action needs to be taken to complete the request
·
4xx – client error – request
contains bad syntax or cannot be fulfilled
·
5xx – server error – the
server failed to fulfill an apparently valid request
Now, we will be exploring above http
status codes in short details
-
200 OK
A 200 status code indicates that the request was successful and
could be the result of any of the following operations: GET, POST, PUT, PATCH, and DELETE
-
201 CREATED
A 201 response indicates that a request was successful and
resulted in a new resource being created. An example of a request which could
result in a 201 status code is when we submit a form to create a new resource.
-
301 FOUND
A 301 response tells us that the resource we’re requesting has
moved permanently. A 301 response must contain a Location header with the URI of the
new location. This Location can
then be used by the client to repeat the request successfully at the new
location.
-
400 BAD REQUEST
This status code means that the HTTP request sent over to the
server has incorrect syntax. For example, if we have submitted a form with
incorrectly formatted data or the wrong data type, this could result in a 400
response
-
401 UNAUTHORIZED
This means that the user who is trying to access the resource by
sending the request has not been properly authenticated. According to the HTTP
standards, when a server responds with a 401 it must also send a WWW-Authenticate header
with a list of the authentication schemes that the server uses.
-
404 NOT FOUND
This status code is returned when the requested resource is not
found. For instance, if we entered a URL for a page that does not exist on a
website or was deleted for some reason, it would result in a 404 response
-
405 METHOD NOT ALLOWED
A 405 response means that the server does not support the method
used in the request. For example, if an endpoint only accepts GET requests and
we try to send a POST, it will result in a 405 response code. If this is the
case, servers must also send back an Allow header field with the list
of the allowed methods.
-
408 REQUEST TIME OUT
This status code is an indication from the server that the request
message was not completed within the time that the server was prepared to wait.
If a client is too slow in sending its HTTP request, this could happen. This
could be due to many reasons, including a slow internet connection.
-
500 INTERNAL SERVER ERROR
An internal server error means that for some reason the server
could not process the request due to an error. This is generally due to a bug
or an unhandled exception on the server.
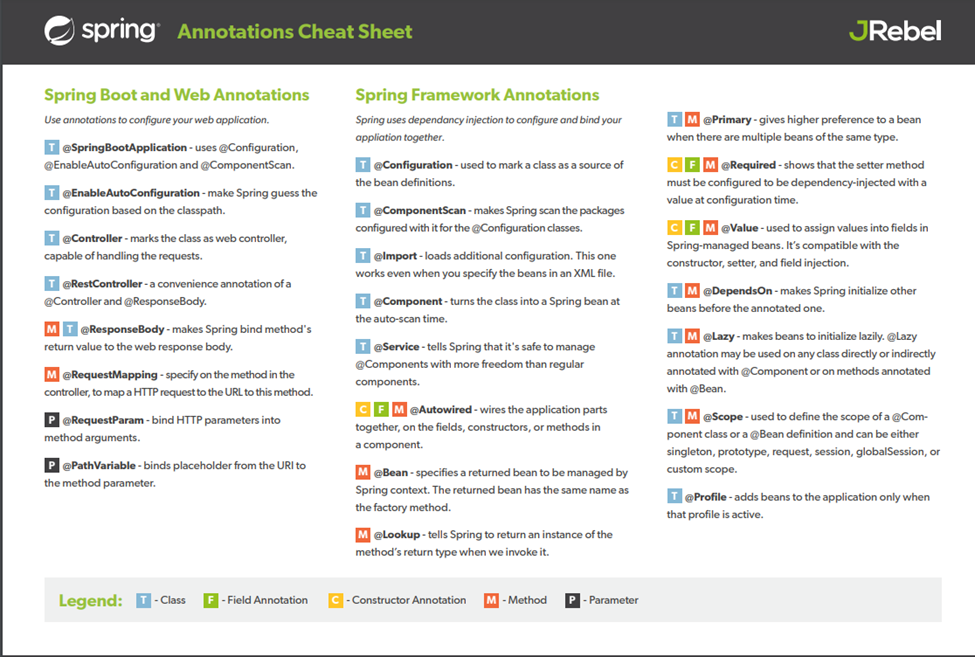
Spring
Boot Annotations
Before the annotations, the Spring Boot project's behavior
was controlled and managed by the XML configurations. Now, the
Annotations provide us several capabilities to manage and configure the
behavior of the Spring Framework. The annotations in Spring Boot takes place in
org.springframework.boot.autoconfigure
and org.springframework.boot.autoconfigure.condition
packages.
Core Spring Framework Annotations
-
@Required
-
@Autowired
-
@Configuration
-
@ComponentScans
-
@Bean
-
@Qualifier
-
@Lazy
-
@Value
Spring Framework StereoType Annotations
-
@Component
-
@Controller
-
@Service
-
@Repository
Spring Boot Annotations
-
@EnableAutoConfiguration
-
@SpringBootApplication
Spring MVC and Rest Annotations
-
@Controller
-
@RequestMapping
-
@GetMapping
-
@PostMapping
-
@PutMapping
-
@DeleteMapping
-
@PatchMapping
-
@RequestBody
-
@ResponseBody
-
@PathVariable
-
@RequestParam
-
@RequestHeader
-
@RestController
-
@RequestAttribute
-
@CookieValue
-
@CrossOrigin
Application Context - ApplicationContext
is a corner stone of a Spring Boot application. It represents the
Spring IoC container and is responsible for instantiating, configuring, and
assembling the beans. The container gets its instructions on what objects to
instantiate, configure, and assemble by reading configuration metadata. The configuration metadata is represented in XML, Java annotations, or
Java code.
Loose coupling –
-
Beans are - Any java class annotated with spring annotation
like @Component or any other annotation. If two components of same type is
available in class path, we can make one of them as primary by using @Primary
annotation with @Component annotation
What are the dependencies of a bean?
-
@Autowired annotated on dependent field, we can
autowired only beans not all java class.
Where to search for beans?
-
Search for bean in package and sub-package of
main spring boot application class is created. @SpringBootAppplication
automatically scan all the packages
Spring application context is the one who manage all the beans
Types of Autowiring (@Autowired)
-
Autowiring by type, can be done
using constructor, setter and no setter or constructor. Fyi, setter and no
setter or constructor injection is same.
@Autowired
Private
SomeBean someBean(){}
“SomeBean
is dependency”
“from
latest version of spring constructor and setter autowiring type is same as
shown above”
Autowiring
Let us understand with an example, we have an SortAlgorithm interface, and there are 2-implementations of it BubbleSortAlgorith and QuickSortAlgorithm. Both
implementations are annotated with @Component and SortAlgorith is added as
dependency in SomeBean then to make
one of the implementations as primary we have 2-approaches.
1. Mark
the component with @Primary Annotation
2. @AutoWired
Private SortAlogrithm bubbleSortAlgorithm;
The second approach is called autowiring by name
If we implement both approaches then @Primary has higher priority.
One more approach is using @Qualifier, then it will change
implementation
@AutoWired
@Qualifier(“quick”)
Private SortAlogrithm sortAlogirthm;
And
in QuickSortAlgorith will be like
@Component
@Qualifier(“quick”)
Private Class QuickSortAlogrithm implements SortAlogrithm(){}

Scope of a Bean
Default - Singleton
ApplicationContext context = new
ApplicationContext()
context.getBean(“BinarySearchImpl”)
1.
Singleton
–
one instance per spring context
2.
Prototype
–
new bean whenever requested
3.
Request
–
one bean per http request
4.
Session
–
one bean per http session
@Scope(ConfigurableBeanFactory.SCOPE_SINGLETON)
Public class BinarySearchImpl(){}
Let us take an
scenario where dependency class need to have prototype scope and target class
to have singleton scope then we have to modify as below
public
class PersonDAO {
JdbcConnection
jdbcConnection;
}
@Scope(value=ConfigurableBeanFactory.SCOPE_PROTOTYPE,
proxyMode
= ScopedProxyMode.TARGET_CLASS)
public
class JdbcConnection {
}
If we
want to include to scan the packages outside of main package we have to add @ComponentScan(“<package
location>”) along with @SpringBootApplication annotation
Lifecycle of a bean
@SpringBootApplication
– is responsible to initialize application context
@Configuration
– is another way of initializing application context for spring application
Spring
IOC container will create the instance of a bean and then destroy when it is no
longer required. Spring IOC controls life cycle of bean.
-
@PostConstruct – this
method will be written inside a bean, soon the bean is created post construct
method executes, soon after bean loaded all dependencies/
-
@PreDestroy – this
method will execute before deleting the bean instance is destroyed
CDI – container and dependency Injection

Above
2-dependencies are required to start spring application. The core feature of
spring are inside the jar spring-core.
Spring Framework is a dependency
injection framework
Bean - Any
java class annotated with @Component/ @Configuration are managed by spring
framework
Autowiring -
@Autowired
Dependency Injection - we
implement dependent class on a target class using @Autowired annotation is
called dependency injection
Inversion of control - any
dependency required by the class will be in control of spring framework is called
IOC, we achieve it by using @Autowire
IOC Container-
anything which will implement IOC
Application context - it
is IOC, where all beans, dependency are created and managed
In
older version of spring we use xml configuration file for loading application
context, there we have to define every component like beans etc, flow is shown
below
--->define
bean --> create XmlapplicationContext.xml file ---> by using xml tag
define beans there
In
spring there are 2-implementation of IOC container bean factory and Application
Context.
@Repository - at model layer
@RestController - at UI/controller layer
@Controller - at UI/controller layer
@ControllerAdvice - at UI/controller layer
@Service - business layer
Testing -
checking the behavior of our code is working as expected, it's check whether
our code is upto business requirement
Syntax-
assertEquals(expecting,
actual) -- if expecting value = actual value then test succeed or else failure
assertTrue(condition)
-- if condition is true then test succeed
assertFalse(condition)..
google for more assert method
Annotation in junit
@Test
@Before - it
will execute before every test(used in probably to initialize some value before
every test method execution)
@After - it
will execute after every test(used in probably to clear data, some value after
every test method execution)
@BeforeClass -
these are class level method, they should be static and they will execute only
once before executing any other test method (used in probably for creating DB
connection)
@AfterClass
-these are class level method, they should be static and they will execute only
once after executing all other test method (used in probably for closing DB
connection or clearing cache)
Maven uses a set of identifiers, also called coordinates, to uniquely identify a project and specify how the project artifact should be packaged: groupId – a unique base name of the company or group that created the project. artifactId – a unique name of the project. version – a version of the project
A Project Object Model or POM is the fundamental unit of work in Maven. It is an XML file that contains information about the project and configuration details used by Maven to build the project. It contains default values for most projects.
@SpringBootApplication = @SpringBootConfiguration + @EnableAutoConfiguration + @ComponentScan
SpringApplication.run(CurrencyExchangeServiceApplication.class,
args);
springApplication.run is responsible to create and return application context

Each dependency inbuilt depend on many more projects. Click on any dependency in pom.xml, it will show you.
Spring AOP
AOP – aspect orientied programming, Spring AOP is one of the implementation of AOP concept. We have other AOP implementation of AOP as well.
AOP
is useful in managing cross cutting concerns like logging, security,
performance checking.
Terminology in AOP
@Before () – it
will execute before the methods mentioned in the package.
Syntax –
@Before("com.in28minutes.spring.aop.springaop.aspect.CommonJoinPointConfig.dataLayerExecution()")
public
void before(JoinPoint joinPoint){}
Pointcut – the expression that define the package/method path that has to be intercepted. Here – below line is pointcut
com.in28minutes.spring.aop.springaop.aspect.CommonJoinPointConfig.dataLayerExecution()
advice – when interception happened, what to do with that/ business logic is called advice. Any code written inside @Before and @After method is called advice
@Aspect = pointcut + advice
Weaving – the process/execution implementing AOP around method
Weaver – framework that manages weaving is called weaver
While implementing AOP in spring boot project keep below points
1. Add
@EnableAspect as shown below
@SpringBootApplication@EnableAspectJAutoProxy(proxyTargetClass=true)
public class SpringBootHelloWorldApplication {2. Create
Aspect class as shown below
@Aspect @Component public class EmployeeServiceAspect {
3. Add
dependency in pom.xml
@Before, @After, @AfterThrowing, @Around are the interception points
To
create common pointcut and use them with @Before, @After interceptor points
follow below lines :
1. Create a class in that create methods as shown below, and use those method name with their package for that pointcut.
public class CommonJoinPointConfig {


   @Pointcut("execution(* com.in28minutes.spring.aop.springaop.data.*.*(..))")

   public void dataLayerExecution(){}


   @Pointcut("execution(* com.in28minutes.spring.aop.springaop.business.*.*(..))")

   public void businessLayerExecution(){}
2. Usage of above pointcut in below:
@Before("com.in28minutes.spring.aop.springaop.aspect.CommonJoinPointConfig.dataLayerExecution()")
public void before(JoinPoint joinPoint){}
we can define custom annotation in AOP
Maven Life Cycle
§ validate -
validate the project is correct and all necessary information is available
§ compile -
compile the source code of the project
§ test -
test the compiled source code using a suitable unit testing framework. These
tests should not require the code be packaged or deployed
§ package -
take the compiled code and package it in its distributable format, such as a
JAR.
§ verify -
run any checks on results of integration tests to ensure quality criteria are
met
§ install -
install the package into the local repository, for use as a dependency in other
projects locally
§ deploy -
done in the build environment, copies the final package to the remote
repository for sharing with other developers and projects.
@SpringBootApplication
public class SpringAopApplication implements CommandLineRunner , it will be helpful in executing on application load

@SpringBootApplication@EnableProcessApplication("Consultations")@EnableEurekaClient@EnableDiscoveryClient
public class ConsultationsApplication { }
@EmbeddedId – composite primary key
@Immutable – defines on table and
collection, it has some different behavior. It prevents update on view
@Mutable – it is default behavior of
entities
What is the main difference between JPA and Hibernate?
Conclusion: The major difference between Hibernate and JPA is that Hibernate
is a framework while JPA is API
specifications. Hibernate is the implementation of all the JPA guidelines
Spring data JPA removes all the boiler plate coding that we write
to create Data Access Layer for our applications while using JPA and ORM tools
like Hibernate. And with the power of spring boot there is zero xml or java
based configuration required.
@RepositoryRestResource(exported = false) – if we are using HATEOS in our microservices then CRUD endpoints are available to public, to avoid it we have to add above annotations to prevent repository from external usage.
@NamedQuery
– it write custom
query on Entity
sd

Comments
Post a Comment